Walkthough - Developing a Nucleus Module
Modules are a type of Nucleus extension which add functionality to the user interface.
This walkthrough assumes that you have installed the Nucleus developer tools from the Downloads page.
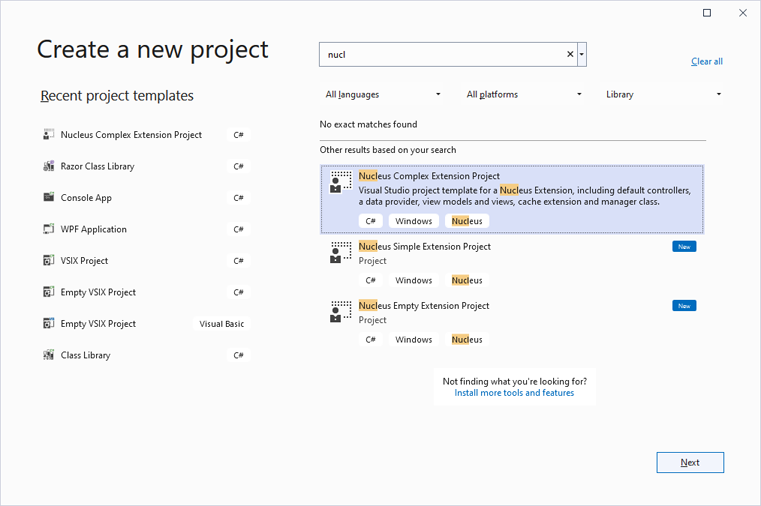
Create a Project
Create a new project in Visual Studio 2022. In the Create a new project Visual Studio dialog, search for "nucleus" to find the Nucleus project templates. If you are creating an extension which writes data to module-specific database tables, select the Nucleus Complex Extension Project project template, which includes controllers, a data provider, view models, views and a manager class. If you are developing a simple module or other extension which uses built-in Nucleus tables to store module settings, use the Nucleus Simple Extension Project template, which does not include data provider and manager classes.
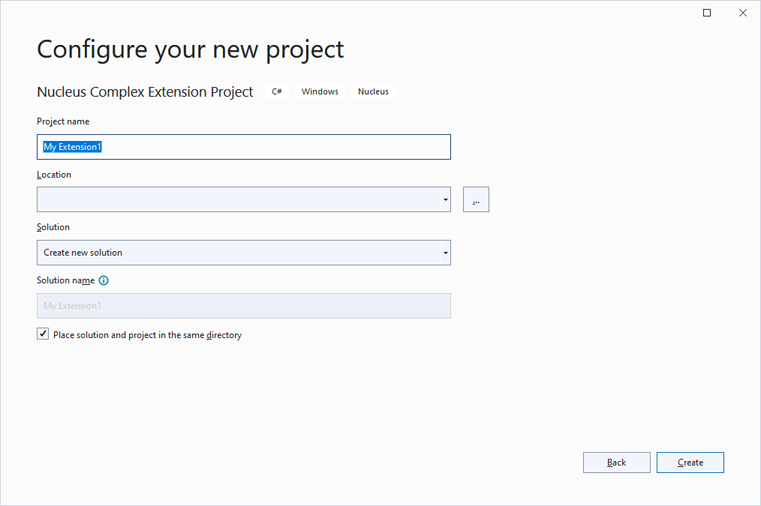
Configure your Project
Enter your project name and the location for your source code files and click Create.
Enter Nucleus project settings.
Your publisher information and the extension friendly name and description are automatically included in the manifest (package.xml) file, and are displayed during installation and in the extensions control panel. You can change this information later by editing package.xml.
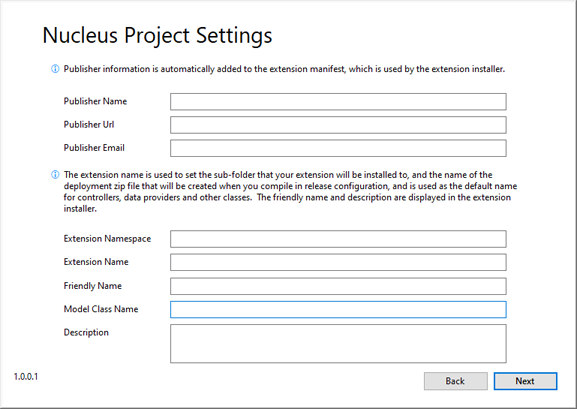
| Extension Namespace | The root namespace for classes in your generated code. |
| Extension Name | The extension name is used as the folder name (in /extensions) for your installed extension, and is also used by MVC routing, so it is a good idea to make sure that it doesn't contain spaces, or any characters which can't be used by file systems or in Urls. |
| Friendly Name | The friendly name is displayed when installing your extension, and in the Extensions control panel after your module is installed. |
| Model Class Name | Class name used when generating code for the default model class, and in other classes which reference it. |
| Description | The description is displayed when installing your extension, and in the Extensions control panel after your module is installed. |
Click Next. Your project is automatically generated and you are ready to start developing.
Develop your Module
The templates reference the Nucleus Nuget packages. You will generally want to use the "Manage Nuget Packages" menu item in Visual Studio to update
to the latest version of each package. You will need to edit your package.xml file <compatibility> element to specify that your extension requires
a minimum version of Nucleus (the version number will match the version of the Nuget packages that you reference.) Refer to the documentation
on extension packaging for more information.
Nucleus Extensions are .Net Core ASP.NET MVC projects which use a controller class which contains
actions (functions). Controller actions execute code to populate view model classes, which are passed to Razor views to generate output.
- Create your database objects.
Navigate toDataProviders/Migrations/Scripts, and edit the01.00.00.jsonscript. Migration scripts are in .json format, and are a (mostly) database agnostic way to define your database objects. The Nucleus project template generates a commented-out example which you can modify to create your database table(s). The main database table for most modules will include an Id column to serve as a unique key for each record, a Module Id column to link your data to a module instance, and DateAdded, AddedBy, DateChanged and ChangedBy columns to provide simple tracking of changes to data. The other columns will be specific to your module. If your module doesn't need its own database tables, you can use the Nucleus Simple Extension Project template, or you can just delete theDataProvidersfolder.
See also: Learn more about database scripts. - Create your Models.
Open the Models folder, and modify the model which was generated by the template. Add properties to represent the columns in your database table. The template model inherits ModelBase, so you do not need to add DateAdded, AddedBy, DateChanged and ChangedBy properties because they are provided byModelBase. - Create your DbContext class.
Review the DbContext class, and add code to the OnModelCreating function to tell Entity Framework about your database model.
Examples: Documents Module, Links Module, Forums Module - Create your DataProvider class.
The template generates an interface and an implementation of the interface in theDataProvidersfolder. Most extensions use Entity Framework to access the database. Add the methods your module needs to access data. - Create your Settings Model.
The settings class is a POCO ('Plain Old CLR Object') class which contains properties to represent the available settings for your extension. If your module will have configuration settings, add properties toModels\Settings.csto represent the settings, and add lines of code to the ReadSettings function to populate them from the ModuleSettings class. In the pattern which is implemented by the template, the Settings and Viewer view model classes inherit the settings class. - Create your CacheExtension class.
The CacheExtension class provides an interface to the Nucleus data caching system. If your module only has a single Model class, the auto-generated class should work as-is. If you have more than one model class that can benefit from data caching, add additional static methods to represent each one. You can remove the Cache Extension class and the code which references it from your Manager class if you don't want to cache data.
See also: Cache Manager Documentation.using System; using Nucleus.Abstractions.Managers; using Nucleus.Abstractions.Models.Cache; using Nucleus.Modules.Documents.Models; namespace Nucleus.Modules.Documents { public static class CacheExtensions { public static CacheCollection<Guid, Document> DocumentCache (this ICacheManager cacheManager) { return cacheManager.Get<Guid, Document>(); } } } - Create your Manager class.
In the pattern which is generated by the template, controllers do not directly call your data provider, they call the manager class. The manager class calls your data provider, and is called by your controllers. It can handle data caching, validation and may perform additional processing. Implement methods in your manager class that your module needs to access data. The template includes code which wraps calls to the.GetData Provider method in a call to the data caching system. If you are not implementing data caching, you can remove the lines of code which call the Nucleus Cache Manager. - Create your Admin controller.
The template generates a separate controller class for Admin functions. Modules with straightforward settings will implement a Settings action to read settings into a view model for on-screen display, and a SaveSettings action to save changes to settings to the database. The auto-generated code will work as-is, you will just need to add lines of code to the SaveSettings method to store any additional settings. Simple settings can be saved to the module'sModuleSettingscollection. More complex settings may use your Manager class to store data in your module's database tables.
See also: More Information on Saving Settings.
Admin controllers normally have an Authorize attribute which controls access to controller actions to users with module edit permissions. Alternatively, the Authorize attribute can be added to each controller action, using the policy name which is appropriate for each action.[Authorize(Policy = Nucleus.Abstractions.Authorization.Constants.MODULE_EDIT_POLICY)] - Create your Viewer controller.
The template generates a separate controller class for View functions, used when displaying the module content to end users. The auto-generated code will work as-is to read module settings from theModuleSettingscollection into your view model, but more complex settings may use your Manager class to read data from your module's database tables. Viewer controller actions may also have an Authorize attribute to control access, if required.
Nucleus automatically checks that the user has View Permission for a module, you do not need to add an Authorize attribute for the view permissions check. - Create your Settings View.
The settings view is displayed in the Nucleus administration user interface. It will display the current settings and will contain a button to save updates to settings. Nucleus.ViewFeatures includes Html Helpers, Tag Helpers and Url extensions to make it easier to develop extensions.
@model Nucleus.Extensions.GoogleAnalytics.ViewModels.Settings
@addTagHelper "*, Nucleus.ViewFeatures"
@using Nucleus.ViewFeatures.HtmlHelpers
@using Nucleus.ViewFeatures
@using Nucleus.Abstractions.Models
@Html.AddStyle("~!/../settings.css")
<div class="nucleus-editor-panel">
  <h2 class="nucleus-control-panel-heading">Google Analytics Settings</h2>
  @using (Html.BeginNucleusForm("Settings", "GoogleAnalytics", FormMethod.Post, new { @enctype = "multipart/form-data" }))
  {
    <fieldset role="group" aria-labelledby="heading">
      <h2 class="nucleus-control-panel-heading">Settings</h2>
      <div class="nucleus-flex-fields">
        <SettingsControl caption="Google Analytics ID" helptext="Enter the Google Analytics ID for your site.  You can disable Google Analytics by setting a blank value.">
          @Html.TextBoxFor(model => model.GoogleAnalyticsId)
        </SettingsControl>
      </div>

      <div class="nucleus-form-buttonrow">
        @Html.SubmitButton("", "Save Settings", @Url.NucleusAction("SaveSettings", "GoogleAnalytics", "GoogleAnalytics"), new { })
      </div>
    </fieldset>
  }
</div>
- Create your Viewer View.
The Viewer view is a Razor view and is displayed to end users. The content and behaviour of the viewer view is dependent on the functionality of your module. - Review package.xml.
Add<folder>and<file>entries for any views or static resources (css, images) that you have added. If your project includes a readme and/or license file, add<file>entries at the root level for them. Files namedreadme.txt, readme.md, readme, readme.htm, license.txt, license.md, licenseorlicense.htmare automatically displayed to end users during installation.
See also: Extension Packaging. - Build your module in release mode.
The Nucleus build script automatically packages your files into an installation (zip) package, located in the same folder as your project (.csproj) file. - Run Nucleus and install your module.
Refer to Installing Extensions for help on installing a module.
In Release configuration, the Nucleus build script creates an installation package. In Debug configuration, the Nucleus build script copies the package files to
%NUCLEUS_PATH%\Extensions\{extension-name}\. When debugging, you will need to install a release build first so that any required database entries are created, but after the first installation you can generally just do a debug build to update the files in your Nucleus test instance.
You can debug by downloading and running the Nucleus source code from GitHub in Visual Studio, or if you are running a compiled version, you can use the Debug/Attach to Process function in Visual Studio to attach to a running instance. If you run
Nucleus.Web.exedirectly, you can attach to the process namedNucleus.Web.exe. If you are running from Internet Information Services, you will attach tow3wp.exe.
%NUCLEUS_PATH%is automatically set to the location of the Nucleus build tools the first time you create a project, but your Nucleus test instance won't be located there, so once you have installed a test instance on your local machine, you will need to edit theNUCLEUS_PATHenvironment variable and point it at your test instance. You will also need to copymodule.build.targetsfrom GitHub to your new%NUCLEUS_PATH%.